Benefits Administration
Benefits Administration enables users to create benefit plans that can be used in open enrollment every year. By using Benefits Administration, municipalities will be able to set up benefits, deductions, coverage options, and rule sets to apply to a benefit plan. Benefit plans can be updated every year in batch and updated either through Benefits Open Enrollment in new world ERP or through Benefit Enrollment in eSuite. This guide will focus more on the new world ERP Benefits Open Enrollment.
This topic is divided into two sections:
The System Administrator and the End User.
This document is available in Microsoft Word format to allow for customization to your organization’s particular needs and procedures.
Set Up Eligibility
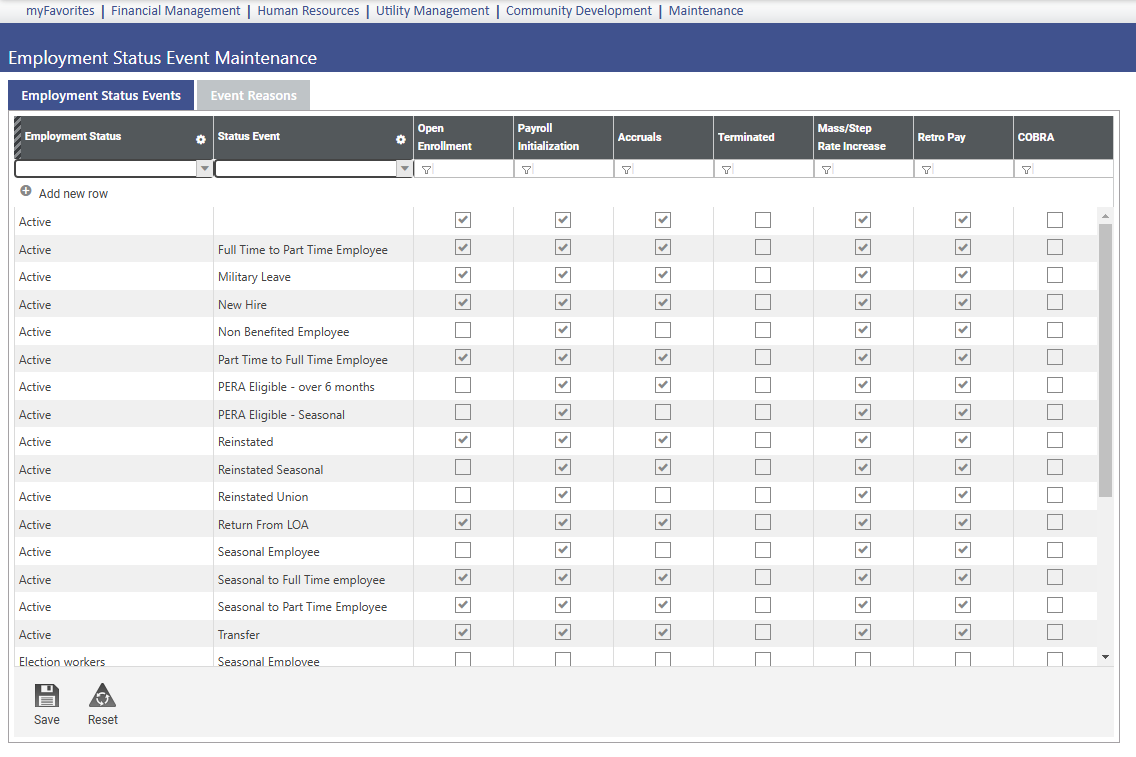
Navigate to Maintenance > Human Resources > Event Maintenance > Employment Status Events.
Check the open enrollment checkboxes for the appropriate employment statuses. This defines the status events that are eligible for Human Resources batch processing. Click Save.
Set Up Validation Sets
Navigate to Maintenance > new world ERP Suite > System > Validation Sets > Validation Set List.
Click New to create Validation Set #88 – Benefit Plan Option with the applicable values:
- Single
- Single + One
- Family
- Retirement
- Life Insurance
Set Up Deductions and Benefits
Navigate to Maintenance > HR > Deductions and Benefits > Deductions.
Click New to create a deduction code for the city-paid portion of any benefit plans you need to create.
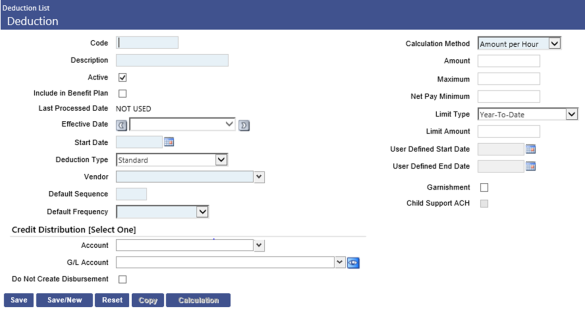
Be sure to check the Include in Benefit Plan checkbox. Make sure that this is marked so it can be used later when creating the benefit plan. Also, make sure that the vendor is accurate. These two items tell the system which deductions and benefits to look for when you create options. Click Save.
Navigate to Maintenance > HR > Benefits and Deductions > Benefits.
Click New to create a new benefit code for any employer-paid portion of any benefit plans you need to create.

The same two items that were important for deduction setup are also important for benefit setup. Be sure to check the box titled Include in Benefit Plan. Also, make sure that your vendor matches what you have entered for the deduction. Click Save.
Set Up Coverage Options
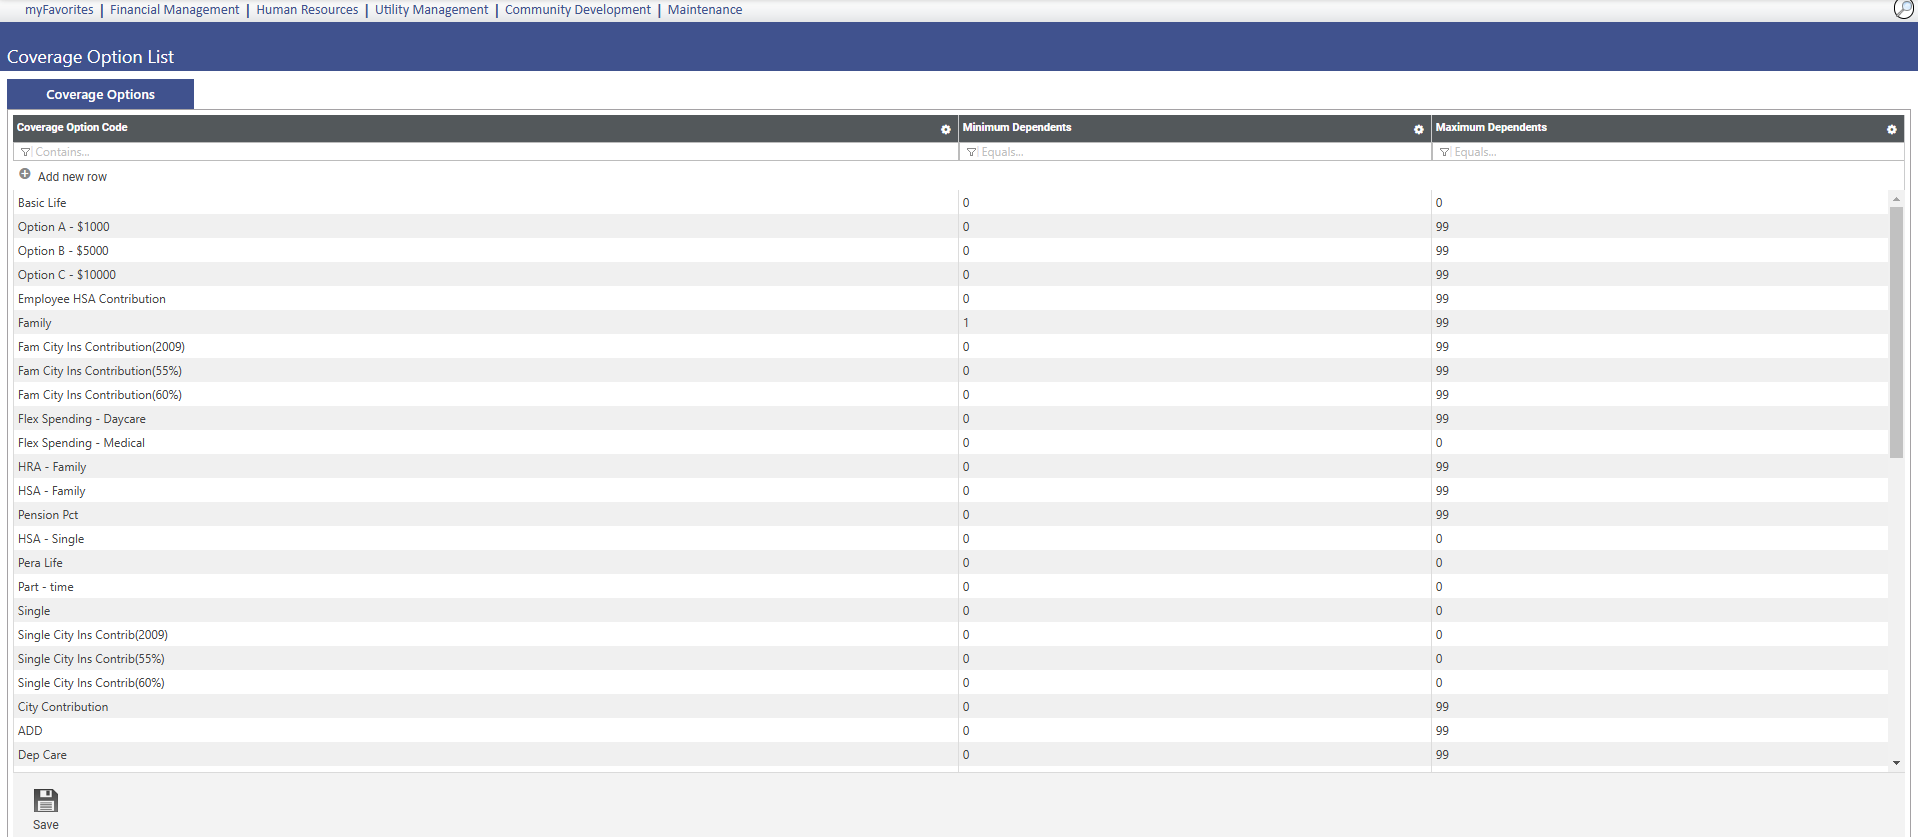
Navigate to Maintenance> HR > Benefits Administration > Coverage Options.
Click Add new row in the grid to create a new coverage option code. Then enter the minimum and maximum number of dependents. These options will be available when you go to make the benefit plan. Click Save.
Set Up Rule Sets
Navigate to Maintenance > HR > Benefits Administration > Rule Sets.
Click New to create a new rule set code that will be available for a benefit plan.
Rule sets establish the eligibility and rate rules for benefit categories.
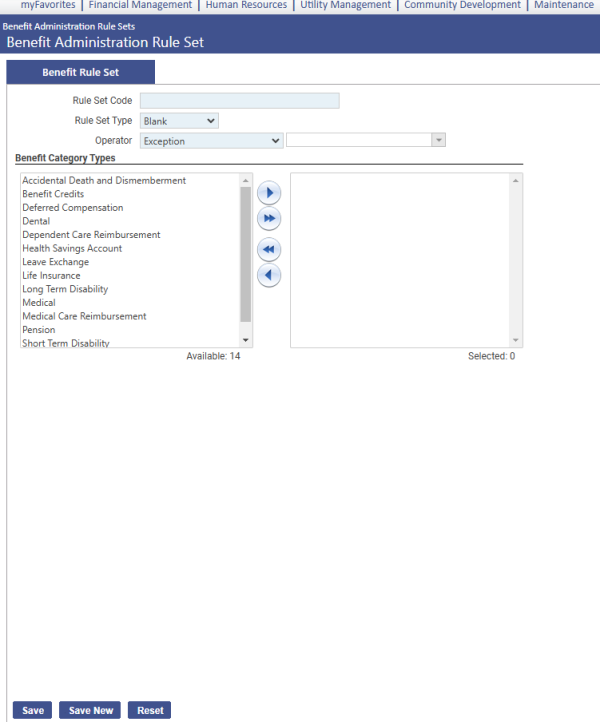
This code must be unique across benefit category types; for example, you may create a code of All that is applied to a Benefit Category Type of Medical and to a Benefit Category Type of Dental but not to category types of Medical and Medical and Dental. Choose the Rule Set Code and Rule Set Type. The Operator says when the rule is effective. Click Save.
Set Up Benefit Plan
Navigate to Maintenance > HR > Benefits Administration >Benefit Plan Maintenance.
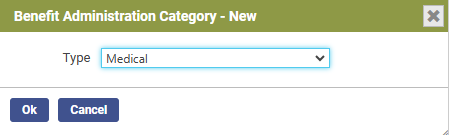
Click New and choose the category type to open the screen where you enter in the new category.
|
Field |
Description |
|---|---|
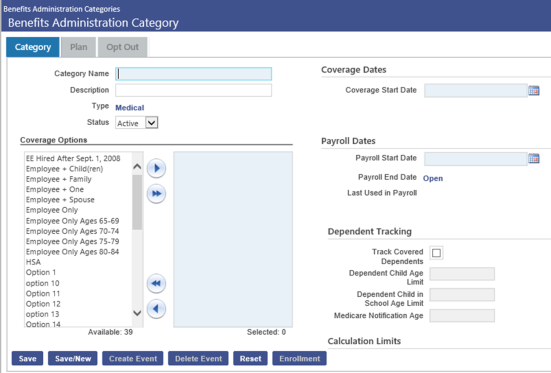
| Category Name |
Required. Full name of the benefit category. This name must be unique and may contain letters and numbers. Once the category has been saved, this name cannot be changed. |
|
Description |
Detailed description of the benefit category. It may be the same as the Category Name and may contain letters and numbers. |
|
Type |
Read-only field containing the category type, i.e., Medical, Dental, selected in the Benefits Administration Category-New pop-up when the category originally is added. This entry determines the number and types of fields that display below the Payroll Dates.
|
|
Coverage Effective Dates |
Shows the date range during which the benefit category is in effect. The current category typically will show <Open> in place of an end date. When you use the Create Event button to select a new Coverage Start Date, an end date will be applied to the current benefit category. If a category contains multiple effective-dated records, gaps may not exist between effective date ranges. The start date of a category may not be changed to a date later than the first date the category was used in a payroll. Use the arrow buttons on either side of the Coverage Effective Dates field to navigate between the different effective date ranges of a category. All related plans, options and rule sets will remain in sync with the date range selected. On first opening this page from the Benefits Administration Categories page, the currently effective record for the category will display. |
|
Coverage Start Date |
Required. First date the coverage for this category is effective. You may edit this date, as long as the associated plan has not been used. |
|
Plan Year |
If filled in, forces a YTD (year-to-date) limit based on annual employee and employer amounts in the benefit plan options. If the field is NULL, no limit is set. |
|
Payroll Start Date |
Required. Determines the actual start of payroll deductions for the selected coverage. |
Note: Once a benefit plan has been used in payroll, it cannot be edited. You must create a new event on the plan. Also, anything you want to see in open enrollment, you must make a category for.
Once you have created a category, click Save to create a new benefit plan.
Click New at the bottom of the screen for the tabs below to appear. If the plan is under a medical, dental, or vision category, this is the screen you will see:
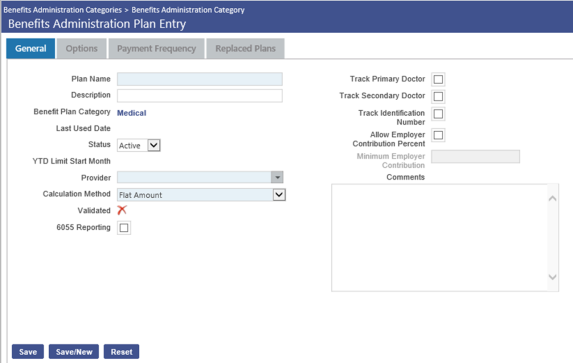
Once you have entered the necessary information, click Save.
Once the plan has been saved, click on the Options tab at the top to tell the system which benefit groups are eligible for this plan.
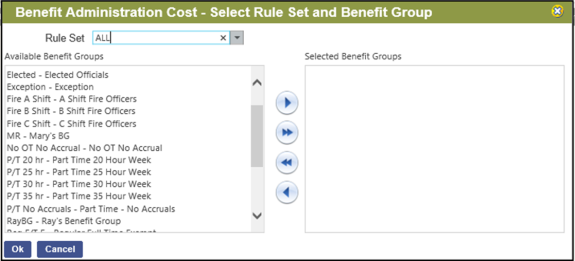
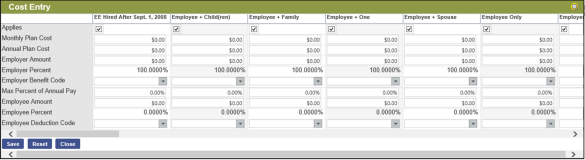
Click OK for the Cost Entry screen to pop up. The columns show each benefit option. The top rows are for employer contribution costs and the bottom rows are for employee contribution costs. Click Save.
|
Applies |
Determines whether this coverage option—Employee, Employee + 1, etc.--applies to the selected plan. If it applies, check the box. |
|---|---|
|
Monthly/Annual Plan Cost |
Total dollar amounts required per month and year to pay for the coverage option selected. |
|
Employer Amount |
Employer's share of the cost, expressed as a fixed dollar amount. For cafeteria benefit plan options, the employer share of the cost will be set automatically to 100%; consequently, this field will be hidden. |
|
Employer Percent |
Employer's share of the cost, expressed as a percentage of the total cost. The acceptable range of entry is from 0.01 to 100.00 percent. Typing a percentage disables the Employer Amount field, and its value and the value of the Employee Share are calculated automatically. Values are recalculated based on the Employee Percent. Typing an amount disables the Employer Percent field, and its value and the value of the employee share are calculated. For cafeteria benefit plan options, the employer share of the cost will be set automatically to 100%; consequently, the Employer Amount field will be hidden. |
|
Employer Benefit Code |
Benefit code used to calculate the employer's share of the cost, required when the benefit plan option contains an employer-paid amount greater than 0%. This code is assigned to an employee upon enrollment in this benefit plan option. A benefit code is available on the drop-down if it is marked in Maintenance as Active, if the Include in Benefit Plan box is checked and if the Vendor is the same as the Provider selected on the General tab of the Benefits Administration Plan Entry page. The Employer Benefit Code cannot be in use by another active benefit plan. This field is disabled if the employee share is $0.00 or 0%. Click the field prompt to select from an alphabetized list of valid codes, or begin to type the code, and select it when it appears in a list of codes that match what you are typing. |
|
Max Percent of Annual Pay |
Maximum amount, expressed as a percentage of annual pay, an employee may contribute in one year. |
|
Employee Amount |
Employee's share of the cost, expressed as a fixed dollar amount, paid through deductions. Typing an amount in this cell automatically calculates and populates the Employee Percent. |
|
Employee Percent |
Employee's share of the cost, expressed as a percentage of the total cost. |
|
Employee Deduction Code |
Deduction code used to calculate the employee's share of the cost, required when the benefit plan option contains an employee-paid amount greater than 0%. This code is assigned to an employee upon enrollment in this benefit plan option. A deduction code is available on the drop-down if it is marked in Maintenance as Active, if the Include in Benefit Plan box is checked and if the Vendor is the same as the Provider selected on the General tab of the Benefits Administration Plan Entry page. The Employee Deduction Code cannot be in use by another active benefit plan. This field is disabled if the employee share is $0.00 or 0%. Click the field prompt to select from an alphabetized list of valid codes, or begin to type the code, and select it when it appears in a list of codes that match what you are typing. |
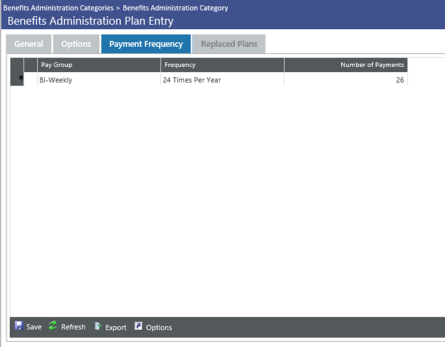
Next, click the Payment Frequency tab to enter in how benefit plans run in payroll.
Life Events Setup
This new feature lets employees who experience qualifying life events submit requests to make changes to their existing benefit plans outside the yearly open enrollment period. You must be licensed to eBenefit.
Set Up Permissions
- Navigate to Maintenance > new world ERP Suite > Security > Users. The User List page will open.
- Select a user.
- Click Permissions. The Permissions page for the selected user will open, showing a grid of application security components.
- In the Filter panel, type life events in the Security Components field (the entry is not case sensitive). The grid will refresh to show only the Life Events components. There are four: Life Events Document, Life Events Post, Life Events Settings and Life Events Workflow Page.
- Select the appropriate permissions for each component. For Life Events Post, selecting Full or Change gives the user permission to validate and post life events. For Life Events Settings, selecting Full or View adds that option to the Benefits Administration Maintenance menu. The Life Events Workflow Page permission selections determine whether the Life Events option is visible on the Human Resources main menu and the extent to which the user is able to process life events.
- Click Save.
- For the permissions to take effect, the user will need to log off and log back on.
Set Up Roles
- Navigate to Maintenance > new world ERP Suite > Security > Roles.
- Click New. The Role page will open.
- In the Role field, type the name of the role.
- Type the Description of the role. (This entry may or may not be the same as the Name.)
- Below the Role and Description is a list of users. Select the check boxes next to the users you want to assign to the role. Assign at least one user.
- Click Save.
- To associate the role and selected user(s) with one or more departments, click the Departments icon located below the list of users. The Associate Departments dialog will open.
- Select the User.
- To associate the user with departments, select the corresponding department check boxes.
- Click Save.
The user will have access to employees who work for the departments selected in step 9.
Set Up Approval Process
- Navigate to Maintenance > new world ERP Suite > Approval Manager.
- Click New. The Create New Process dialog will open.
- Select the Effective Date of the approval process.
- Type the Name of the approval process.
- In the Type field, select Life Events.
- If you want to set up a sequential approval process, select Sequential Approval.
- Select the check boxes next to the departments that will use the approval process.
- Click Save. The Edit Process dialog will open, containing a list of the department(s) you just added.
- Click the Departments icon if you need to add departments to this process.
Next, you will add approval levels to a department.
- (If you added and saved departments in step 9, click the Back button.)
- Select/Highlight a department that will use this approval process.
- Click Approval Levels.
- The Manage Approval Levels dialog will open.
- Click Add. The Edit Approval Level dialog will open.
- Type the Name of the approval level.
- In the Required Approvers (#) field, type the number of approvers required at this level.
- Click Save. The Manage Approval Levels dialog will reopen, containing a row for the level you just created.
To add another approval level, repeat steps 13-16.
When you are finished, the Manage Approval Levels dialog should contain rows for each approval level.
Next, you will add users to the approval level(s).
- Click the Back button. The Edit Process dialog will open.
- Click the name of a department in the grid. The Manage Approval Levels dialog will open.
- Click an approval level. The Edit Approval Level dialog will open, with a list of users displayed below the Name and Required Approvers (#) fields.
- Select the check box next to each user who will approve at this level.
- Click Save.
- Repeat steps 20-22 for the next approval level and add users as necessary. You may reorder approval levels by dragging them to the appropriate places.
- Click Back to return to the Approval Manager grid.
Set Up Life Events
- Navigate to Maintenance > Human Resources > Benefits Administration > Life Events Settings.
- On the General tab, select the Life Events Approval Process. The Approval Process drop-down contains an alphabetical list of the approval processes that have been assigned a Life Events process type in Approval Manager.
- The Hire/Rehire Date is enabled and required when the Hire/Rehire life event is selected. Select one of the benefit eligibility date types: Accrual Date, Benefit Date, Hire Date, Seniority or any user-defined date type from the Employment tab of Workforce Administration.
- In the Life Event grid, select the life events that will be available for processing for the selected approval process and roles.
- On the Categories tab, select the benefit categories that will be available for life events processing.
- On the Roles tab, assign roles to the Life Events approval process by moving them from the Available list box to the Selected list box. The Available list box contains all roles that have been created at Maintenance > new world ERP Suite > Security > Roles. (For more on roles, see Create roles for users and associate departments with roles above.)
- Click Save.
Set Up Email Notifications
- To create the link for email notifications that are sent when life events are submitted from eBenefit Enrollment, navigate to Maintenance > new world ERP Suite > System > Company Suite Settings.
- Click the eSuite tab.
- Type the eSuite site URL for the eHRAccess setting.
- Click Save.
Set Up Life Events in eSuite
- From the new world Administration page, navigate to eAdministration > eHR > eEmployee > Employee Account Maintenance.
- Select an Employee. The Manage Employee Account section will appear.
- In the Access Roles section, select the eBenefitsLifeEventEmployee check box.
Selecting this box adds a Life Events option to the selected employee's Benefit Enrollment tab on the HR Portal, where the employee may create and submit life events.
- Click Save.
Add custom content to the top of the Life Events pages:
- From the new world Administration page, navigate to eAdministration > eHR > eEmployee > Content Configuration.
- In the Select a Module drop-down, select eLifeEvents.
- In the Select a Content Region drop-down, select the Life Events page or message for which you want to add custom content. You may add custom content for the following:
- Decline message
- Dental message
- Dependent coverage
- Dependent entry message
- Document message
- Life event header
- Live event submit message
- Life event welcome message
- Medical message
- Payroll authorization message
- Plan documents message
- Printer friendly message
- Setup incomplete message
- Summary message
- Vision message
- Type your content in the space at the bottom of the page.
- Click Save.
Add plan documentation and links for employees:
- To provide plan documentation and links for employees on the Life Events page, navigate to eAdministration > eHR > eBenefits > Manage LIfe Event Documentation. The Life Event Document Management page will open.
- To add a document, click the Add a Document button. The Plan Document (Add/Edit) page will open.
- In the Title field, type the title of the document as you will want it to appear in the enrollment and documents navigation panel on the Life Event page (see next section, Submitting a life event from eSuite).
- To upload a document, select the Upload a Document radio button and browse for the file. To link to a document, select the Link to an Existing Document radio button and fill in the URL.
- Click Save. The document title will be added to the Life Event Document Management page, with the options to edit and delete to the right of the title. The title also will appear on the enrollment and documents navigation panel as a link for employees.
Now that your benefit plans are built, you can start the open enrollment process.
Updating Benefit Categories
When it is time to update Benefit Categories for the year, Navigate to Maintenance > Human Resources > Benefits Administration > Benefit Plan Maintenance.
Click Create Event at the bottom of a selected benefit category. The dates for the next year will automatically populate. Click OK.
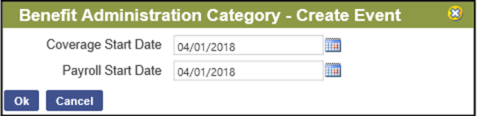
Make any necessary updates to the plan and click Save.
Processing Open Enrollment
- Navigate to HR > Benefits Administration > Open Enrollment.
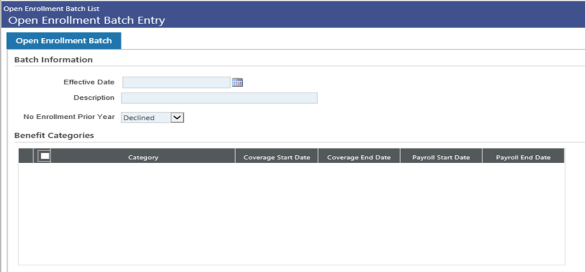
- Click New at the bottom of the screen to display the Open Enrollment Batch Entry screen.
- Enter in Effective Date. The Benefit Categories section populates based on what Effective Date you enter based on the plan’s coverage start dates.
- Description is what will display on the Benefit Open Enrollment page.
- No Enrollment Prior Year:
No Selection will require the user to select a coverage option for those who have not previously made a selection.
Declined will default employees to the plan within this category and edits can be made.
- Select the category you want in the plan. Coverage start dates and payroll dates can be adjusted in the grid.
- Move over the applicable benefit groups and click Create Batch.

Back on the Open Enrollment Batch List, click on the batch you just created to open the Open Enrollment Batch Employee List page that shows all the employees in the batch.

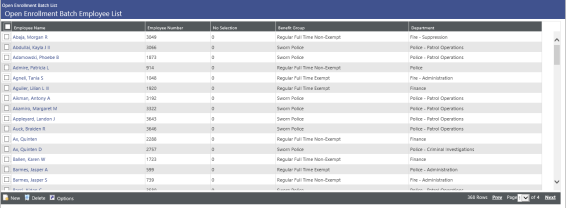
On the Employee List, click on an employee to make any necessary edits if they are changing their enrollment. Click the edit icon in the pop up for the Benefit Plan Detail pop up to display.
Click New at the bottom if you need to enter in an employee into the batch.
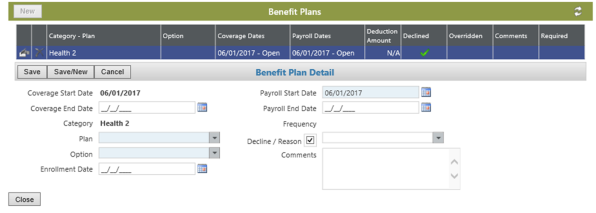
Make any necessary changes and click Save. Breadcrumb back to the Open Enrollment Batch List.
- Click the Validation tab.
- Select the Description and click Submit. A validation report will be created in myReports. Open this report and review any errors.
- Click the Print Edit & Error Listing tab.
- Click the Description and click Submit.
- Go to myReports to review the created reports.
- Click the Post tab.
- Select the Description and click Submit. This will update the employees with new enrollment for the coverage dates and categories that were entered during enrollment. An edit report will also be sent to myReports.
Submitting a Life Event in eSuite
The following example uses a birth/adoption life event:
- From the HR portal, navigate to BENEFIT ENROLLMENT > Life Events.
- The Life page will load, containing a grid of any life events completed in the past and a NEW LIFE EVENT button. Click the NEW LIFE EVENT button. The Life Events start page will load, containing an enrollment and documents navigation panel, a Life Event Type field, an Event Date field and a grid of current dependents. This page is the launching point for adding a life event and enrolling in benefits.
- Select a Life Event Type. Selections currently available are Birth/Adoption, Divorce, Marriage and Hire/Rehire.
- Select an Event Date.
- Click SAVE AND CONTINUE. The Dependent Entry page will load, containing fields for the entry of your dependent's information.
- Fill in your dependent's information. Required entries are First Name, Last Name, Birth Date, Gender and Relationship. If Comments exceed the display length, hover functionality will show the complete text. (If you try to exit the page before saving entries, you will receive a message saying you have unsaved entries and asking you to confirm you want to exit.)
- When you have made your entries, click ADD. A New Dependents grid will appear at the bottom of the page, populated with your dependent's information.
- If you need to remove a dependent from the grid, click the red X in the Delete column of the appropriate row. A pop-up will ask you to confirm the delete. If you need to edit a dependent’s information, click the pencil icon in the Edit column. Entries from the New Dependents grid will re-populate the dependent entry fields, and the ADD button will be replaced by an UPDATE button.
- When you are satisfied with your entries, click SAVE AND CONTINUE. The Upload Documentation page will open, containing an area for uploading supporting documentation, such as a birth certificate, and a grid containing the added dependent's information.
- Browse for and select the document file.
- Click UPLOAD THE DOCUMENT. The document will be added to a Documents grid directly above the Added Dependents grid and will be associated exclusively with the life event. (If the document could not be uploaded, an error message will explain why.)
In Workforce Administration, if new world ERP is integrated with Content Manager, document counts will appear next to the document icon, telling you at a glance whether the records you are viewing have documents attached and, if so, how many.
- When you have finished uploading documents, click SAVE AND CONTINUE. The page for the first benefit category in the Enrollment section of the navigation panel will open, showing your current plan election and pay period deduction at the top, with plan options and employer and employee costs per pay period below. The eligible plans and plan costs displayed are as of the date of the life event.
All defined enrollment categories will display individually as links in the navigation panel, allowing you to enroll in one plan per category. Each category will have its own enrollment page. Eligibility for a category is determined by the benefit groups assigned to the rule set in Benefits Administration maintenance in new world ERP. You will see only the categories for which you are eligible and your cost per pay period for each category as of the date of the life event. If you have not enrolled or have declined coverage in a category, your cost will show as $0.00. As you complete categories, you will be able to use the navigation links to toggle back and forth and make changes, if necessary.
The Plan Documents section contains links to documents related to life events and the enrollment process.
- If necessary, change the plan election to accommodate the life event.
- Click CONTINUE to save the plan election. If the category is flagged in new world ERP Benefits Administration maintenance to track covered dependents, the Select Covered Individual(s) page will open, containing a grid of your active dependents, including the dependent just added through the Life Events process, and their relationships to you.
If you added custom content for Dependent Coverage in Content Configuration, it will display at the top of the page.
- Select the individuals to be covered by the plan. The Self check box, referring to you, is selected by default and disabled. The number of covered individuals must coincide with the coverage option selected on the Category tab of the Benefits Administration Category page in new world ERP Benefits Administration maintenance. (If you select incorrectly, an error message will explain why.)
- If you need to change your plan selection, click BACK TO PLAN SELECTION; otherwise, once you have made your selections, click SAVE AND CONTINUE. The page of the next benefit category in the Enrollment section of the navigation panel will open.
- Continue through the benefit enrollment process, making changes where necessary. To go back to a benefit category, click the corresponding link in the navigation panel. As you enroll in categories, the links will turn gray, and check marks will appear next to the category names. If you log out before completing the entire process, you will have the option to resume or cancel the life event the next time you log in and select the Life Events option from the BENEFIT ENROLLMENT menu.
When you complete the final benefit category, a Confirm & Submit page will open, showing a summary of your elections.
If you added custom content for Summary Message in Content Configuration, it will display at the top of the page.
- If you are satisfied with your elections, click SUBMIT.
- A confirmation pop-up will open, giving you the option to click OK to submit or Cancel to go back and make changes.
As soon as you submit the life event, you will receive a Confirmation Statement summarizing your elections and giving you the option to print the statement.
Also, email notifications will be sent to the primary email address you have selected in Workforce Administration and to the email address(es) of the approvers.
The life event will appear with a link in the myTasks section of the approver's home page and on the Life Events page in new world ERP, where it will go through the approval and post processes.
- When you close the Confirmation Statement, the Confirm & Submit page will provide a VIEW YOUR LIFE EVENTS button to let you view a grid containing the life event, life event number, life event date, status and submitted date of the life event. Clicking the life event number will take you back to the Confirmation Statement.
- To view or print your Confirmation Statement at a later time, from the HR Portal, navigate to BENEFIT ENROLLMENT > Life Events. The Life Event history page will open.
- Click the hyperlinked Life Event Number.
Managing Life Events in new world ERP
Navigate to Human Resources > Life Events. The Life Events page will open.
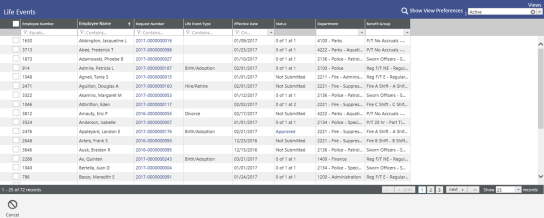
Employee life event submissions from the HR Portal appear on this page in a grid, with each row corresponding to a life event. You may sort or filter the grid by any column. To sort, click in the column header; to filter, type in the Contains field directly below the column header.
Use the Views field in the top-right corner of the Life Events page to reload the grid with life event submissions in each status.
Use the Show View Preferences button to set a default view for the list of life event submissions; for example, to set the default to all submissions that need approval, click Show View Preferences, and select To Approve in the Select Default View field. After that, each time you open the Life Events page, only the submissions that need approval will display.
If a life event has a validation warning or error, a red X will display in the Status column. Click the X to open a Life Event Error Listing that contains a description of each warning or error.
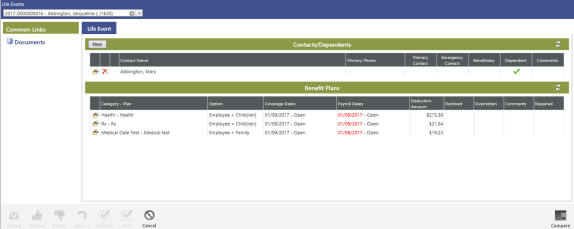
Request numbers in the grid link to the Contacts/Dependents and Benefit Plans sections of Workforce, where the life event entries submitted from the HR Portal will appear on a Life Event tab. According to your security permissions, you may view or edit the entries in these sections and add contacts, dependents and benefit plans.
The bottom of this page and the Life Events page contain a series of icons that will change depending on your security setup and the status of a life event or the view selected.
Approve
If you have received a life event approval task in the myTasks panel of your home page, you may click the Transaction ID, and it will take you directly to the Life Event approval page (step 3 below).
- In lieu of that, navigate to Human Resources > Life Events.
- In the Views field in the top-right corner, select the To Approve view. The Life Events grid will reload to show only the events that are awaiting approval.
- The bottom of the page contains a series of icons, including Approve, Reject, Return and Cancel. If the life event is at your level of approval, the icons will be active. You may select the event and click the Approve icon. You also may click the employee's Request Number. The Life Event approval page will open, containing the same series of icons at the bottom.

- Click the Approve icon to approve the event. The Approve dialog will open. If you are not the last or only approver, the next approval level will be the default selection in the Send To field. If you want to send an approval request to a particular approver at the next level, you may select the name from the drop-down.
- If necessary, add a Comment.
- Click Submit. The Approve Results pop-up will open, and an approval request will be sent to the next approver's email address and myTasks panel.
- Using the appropriate icon along the way, an approver with permission set up in Approval Manager may reject the request, return the request to the previous level or cancel the request.
- The results of these actions will show in the approval display summary. Click the Compare icon in the bottom-right corner of the Life Event approval page to view the approval display summary and, below that in red, the new information related to the life event.
- To view a diagram showing the status of the approval process, including the dates and times of each action taken, click any one of the approval step icons in the approval display summary.
Validate and Post
Once the approval process for a life event has completed, the Validate icon will be enabled on the To Validate view of the general Life Events page and on the employee's Life Event page.
- To validate a selected life event submission, click the Validate icon. A Validation Results pop-up will display to let you know whether the validation was successful.
If one or more warnings are generated, the validation will be successful, but the pop-up will display a warning(s)/error(s) message in red. You may click the message to view a listing of the warning(s). If one or more errors are generated, the validation will be unsuccessful, but the listing will explain the errors so they may be corrected, if possible.
- Click Close to close the Validation Results pop-up. If the validation was successful, the Post icon will be enabled on the To Post view of the general Life Events page and on the employee's Life Event page.
- To post a selected life event submission, click the Post icon. A dialog will display, asking you to confirm whether you want to post.
- Click OK to post. The life event will be added to the Posted view on the Life Events page, the employee who submitted the life event will be notified by email of the event's approval, and the changes will add to the appropriate sections on the employee's Workforce Administration page.